Home
Our Camping Experience

FAQ Page

Guest Book

Natasha Pages:
About Natasha
Natasha Pictures
How Could You?
Doggie Dictionary
Camping With Your Dog

Camp Site Pages:
Our Trips
Fort Wilderness
DC Camping

Camper Pages:
Our Camper
Tow Vehicle
Site Statistics

Modification & Service:
Detachable Power Cable
Modified Drawers
Mirror
Single Drain System
Drill Lift System
LED Light System
Accumulator Tank
Florescent Light
Bike Rack
Outside Shower
Batteries in a PU
Bed End Tray
Battery Charge Cable
Stove Counter
AC Brace
WH Wind Guard
RV Plug @ Home
Awning Base
12v Power Adaptor
Battery Meter
Water Level Indicator
Tongue Jack Service
Our Bunk

Information:
Camping With Your Dog
Camping Checklist
Dry Camping
Pop Up Brakes
Break Away Switch
Campsite Safety
Towing & Hitch Info
Sway Information
Gray Water
Porta Potti
RV Air Conditioning 
Pop Up Tires
Changing a Flat Tire
Pop Up Refrigerator
Camp Site Power
Trailer Dolly
Folding Camp Table
Awning Base
Level Your PopUp
Winterize Your PopUp
Spring Set Up
Camp Cooking Accessories
Buying a Used PopUp
Message Board Shorthand

Camping Links:
PopUpTimes
Camping Links
Camping Club Links
Manufacturer Links

GSD Links:
MidAtlantic GS Rescue
GS Rescue of LA
Virginia GS Rescue
Flying Dog Press


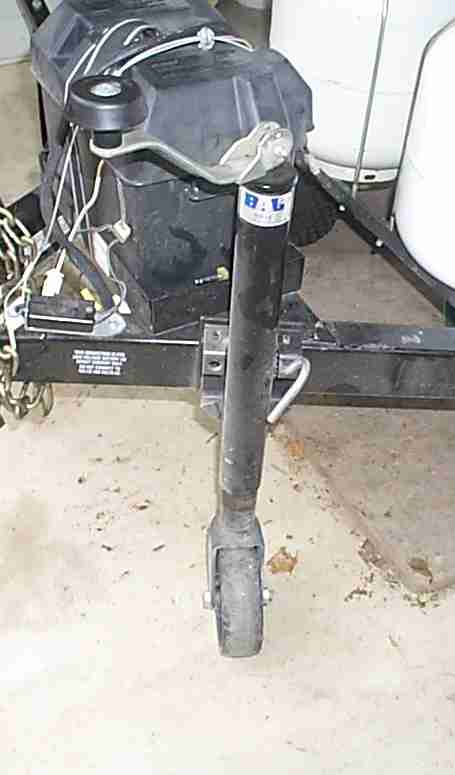
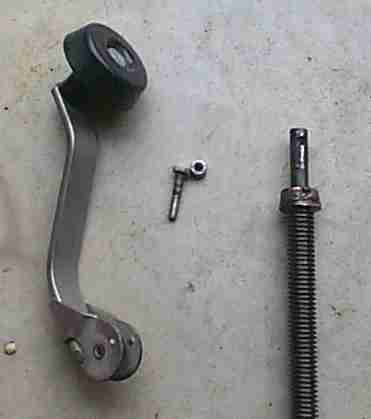
Servicing a Coleman Tongue Jack

Thanks to knute on the Pop Up Times Message board for providing the details of this service he conducted to his 1999 Coleman Santa Fe

It should be noted that there are several manufacturers of tongue jacks used by pop up campers.  The instructions below are for a jack manufactured by BAL, and marked "800 Lbs"  Model 29005.  Parts or additional information is available from Norco Inc.

1.        Raise tongue using jack

2.        Chock both wheels, front and back

3.        Support tongue with an appropriate device. You could use a trailer dolly or 15”-16” long piece of 4x4.

4.        Release locking pin to tilt jack assembly to approximately 45 degrees toward traveling position.

5.        Raise jack until it is fully extended.

6.        Remove bolt securing crank to jack using a 7/16” socket and box end wrench and remove crank.

7.        Slide lower jack assembly  out of upper housing

8.        Remove thrust bearing and thrust washer (located at top end of the threaded rod assembly in the bottom picture)

9.     Clean thrust bearing and thrust washer.  You may find it easier to use a parts cleaning solution which is available in small containers at most auto parts stores. If necessary, replace the thrust washer and seal.

11.     Repack thrust bearing with wheel bearing grease.

12.     Clean screw.

13.     Lubricate screw with wheel bearing grease, ¼” wide ribbon on one side of screw for entire length of screw.

14.     Place thrust washer back on assembly

15.     Place thrust bearing on top of thrust washer.

16.     Slide assembly back into upper jack housing.

17.     Install crank and bolt.

18.     Fully retract jack.

19.     Orient jack to the vertical position

20.     Raise jack to fully extended position.

21.     Remove 4x4 block.

22.     Lower jack to fully retracted position


Note:  Make sure that the trailer is properly blocked PRIOR to beginning any service.  Do not allow pets, children or any part of your body get under the tongue area while it is blocked up in the air.

This service should take less than 30 minutes to complete.  The only tools necessary are the 7/16” socket and box end wrench, and a small supply of bearing grease to repack the thrust bearing.  


   Revised: May 08, 2007


Copyright © 2001-2007  TRH [tim5055]     All rights reserved   Our Privacy Policy
 

Home  |  E-Mail Tim  | Frequently Asked Questions  | Guest Book